Thursday, January 28, 2010

Green Lemonade


So, I've got another juice. It's almost the same as the last one, except it's expertly called a "Green Lemonade" by Natalia Rose. Her book, "The Raw Food Detox Diet" was given to me by that friend Whitney I mentioned earlier. Although I don't think my body would ever do well on a completely raw food diet, this book definitely gave my warped cheese-fry loving brain some nutritional insight.

One of these insights was how good fresh juice is for you. It's extremely enzyme-rich, which makes all the nutrients easily absorbed in your body and can therefore fuel you better! How cool!

And why not just eat vegetables, you may ask? Well, for one, that's a lot of chompin! And two, there are enzymes (what the heck is an enzyme?) trapped inside the fibers of fresh vegetables that can't be absorbed through normal digestion. But guess what? A juicer can release those darned enzymes! How miraculous (much like childbirth...or not).

I'm done rambling. This is Ms. Rose's favorite juice, the "Green Lemonade". She recommends enjoying it first thing in the morning, on an empty stomach.

Green Lemonade
Natalia Rose

1 head romaine lettuce
5 to 6 stalks kale
1 to 2 apples
1 whole lemon
1 to 2 inches fresh ginger

Process in juicer. Gulp 'er down!

Wednesday, January 27, 2010

Blueberry Muffins


I got so much for Christmas this year that it was simply impossible to pack it all in my suitcase back to NY. So the parental units and I packed whatever I couldn't fit (my Martha Stewart Cupcake and Cookie books, a cookie decorating book, 2 cookie sheets and The New Best Recipe Cookbook, among other things). I know, I'm a fairly spoiled young lady =) Get over it!

When the mailman came to deliver this nice, large, pretty heavy box, no one was home (such my luck). And, of course, the Post Service here in NY will not try to redeliver. Unfortunately I live 10 blocks away from the post office, which happens to be right next to the subway station, but is always closed when I get home. One morning a few weeks ago, I decided my arms were ready for some fun and decided to get said box.

Now, I am not a weak person, but as the post office woman laughed at me as I struggled out of the door, I realized the next 15 minutes were going to be brutal on my poor arms. With a hurt foot, I figured my arms could use a little workout. I got a full 2 blocks before I had to set my precious gifts down and take a breather.

I finally managed to lug the big box back to my apartment. And don't worry, even though my arms were sore for about 2 days afterwards, the contents of the box made up for it! And if I hadn't done said box lifting, I wouldn't have been able to share these really awesome blueberry muffins with my co-workers.

Blueberry Muffins
The New Best Recipe Cookbook

2 cups unbleached all-purpose flour
1 tablespoons baking powder
1/2 teaspoon salt
1 large egg
1 cup sugar
4 tablespoons unsalted butter, melted and cooled slightly
1 1/4 cups sour cream (I used greek yogurt)
1 1/2 cups frozen blueberries

Preheat the oven to 350 degrees F. Grease a standard 12-cup muffin tin and set aside.

Whisk the flour, baking powder and salt in a medium bowl until combined. Whisk the egg in a second medium bowl until well combined and light-colored, about 20 seconds. Add the sugar and whisk vigorously until thick and homogeneous, about 30 seconds; add the melted butter in 2 or 3 additions, whisking to combine after each addition. Add the sour cream (or greek yogurt) in 2 additions, whisking just to combine.

Add the berries to the dry ingredients and gently toss just to combine. Add the sour cream (or yogurt) mixture and fold with a rubber spatula until the batter comes together and the berries are evenly distributed, 25-30 seconds (small spots of flour may remain, and the batter will be thick. Do not overmix).

Using a large spoon, divide the batter among the greased muffin cups. Bake until the muffins are light golden brown, 25 to 30 minutes.

While the muffins are cooling, mix 1/2 cup sugar and 1/2 teaspoon ground cinnamon in a small bowl and melt 4 tablespoons butter in a small saucepan. After the baked muffins have cooled 5 minutes, working one at a time, dip the top of each muffin in melted butter and then cinnamon sugar. Set the muffins upright on a wire rack.

Tuesday, January 26, 2010

Cream-Filled Chocolate Sandwiches aka Oreos

Spice and I came to the conclusion the other day that there are few store-bought cookies we will eat. Most are pretty awful compared to a homemade cookie. Oreos, however, are definitely one-of-a-kind and we both will eat them store-bought. Nothing, however, beats homemade oreos. A crispy, chocolate cookie enveloping a super sweet vanilla filling. I'm salivating.

*Drool being wiped from chin.

Anywhoo, go make some oreos. And try not to eat them all.
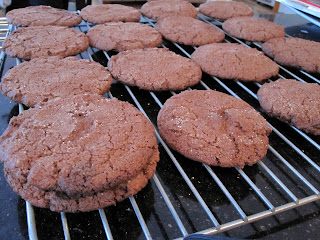

Cream-Filled Chocolate Sandwiches
Martha's Cookie Book

1 1/4 cup all-purpose flour
3/4 cup Dutch-process cocoa powder
1 teaspoon baking soda
1/4 teaspoon baking powder
1/4 teaspoon salt
1 1/2 cups sugar, plus more for flattening cookies
10 tablespoons unsalted butter, room temperature
1 large egg, room temperature

Preheat oven to 375 degrees F. Into a bowl, sift together flour, cocoa powder, baking soda, baking powder and salt.

In the bowl of an electric mixer fitted with the paddle attachment, cream sugar and butter until light and fluffy, about 2 minutes. Add egg; beat to combine. With mixer on low speed, gradually add flour mixture; continue beating until dough is well-combined.

Using a 1 1/4 inch ice cream scoop, drop dough onto parchment-lined baking sheets about 2 inches apart. Dip bottom of a glass in sugar; press to flatten cookies to about 1/8 inch thick.

Transfer to oven and bake until cookies are firm, 10 to 12 minutes, rotating sheets halfway through. Transfer baking sheets to wire rack to cool completely.

Place cream filling in a pastry bag and pipe about 1 tablespoon filling onto the flat side of half the cookies. Place remaining cookies on top, and gently press on each to squeeze filling to edges.

Vanilla Cream Filling
Martha's Cookie Book

1/2 cup unsalted butter, room temperature
1/2 cup solid vegetable shortening
3 1/2 cups confectioners' sugar
1 tablespoon pure vanilla exract

With an electric mixer, cream butter and shortening until well-combined. On low speed, gradually add confectioners' sugar and continue beating until light and fluffy, about 2 minutes. Add vanilla and beat to combine.

Monday, January 25, 2010

Did You Miss Me?


Greetings Foodies!

It has been quite sometime since I have graced this blog with my presence. And in my absence I am appalled at what has been done. Sugar, my darling roomie, has given you dessert after dessert, sure her chocolates, cupcakes, and cookies are delicious (I should know, I get to eat them all!) But I know first hand the perils of so many sweets, the dreaded Sugar Crash and the resulting withdrawals. I can see you now withering on the floor screaming for someone to give you just one more cookie, but it never is just one more, is it?

But don't worry I am here now and promise to help the best way I know how, with carbs.

For Christmas this year my parents got me The Bread Baker's Apprentice, and I have decided to work my way through this book one recipe a week and share what I have learned with all of you. Now keep in mind that some of these recipes are involved and many of them have steps that you have to do hours if not days before. But I promise you the results will be worth it.

Week 1 - Anadama Bread
I love this bread and it makes the best toast! This recipe makes 3 loaves and they do freeze well so I would recommend just doing the whole batch so you always have some yummy bread on hand.


Soaker:

6 ounces of course ground cornmeal aka polenta

8 ounces/ 1 cup of water


Dough:

20.25 ounces/ 4.5 cups of unbleached bread flour

2 teaspoons of instant yeast

8 ounces of water

1.5 teaspoon of salt

4 ounces of molasses

1 ounce of shortening

cornmeal for dusting


Day Before:

Make soaker by mixing cornmeal and water, cover with plastic wrap and let sit overnight at room temp


Make Dough:

Stir together 2 cups flour, yeast, soaker and water in mixer bowl. Cover with towel and ferment for 1 hour, until the mix begins to bubble.

Add remaining 2.5 cups of flour, salt, molasses, and shortening on low speed with paddle attachment, until all ingredients form a ball. Add water if necessary to make a soft, slightly sticky mass. Knead on medium speed for 6 to 8 minutes.


Lightly oil a bowl and transfer dough, rolling it around to coat with oil. Cover bowl with plastic wrap and ferment at room temperature fro 90 minutes, or until it doubles in size.


Remove dough from bowl and divide into 3 parts of 16 ounces. Shape the dough into loaves and place into slightly oiled bread pans (8.5 by 4.5 pans) Mist the top with cooking spray and loosely cover with plastic wrap.

Proof at room temperature fro 90 minutes or until loaves crest about pans.


Preheat oven to 350 with over rack in the middle shelf. Place bread pans on a sheet pan and remove plastic wrap. Mist tops of loaves with water and sprinkle cornmeal on top.


Bake for 20 minutes. Rotate the sheet pan and bake another 20/30 minutes until loaves are golden brown, and register at least 185 to 190 in center. Makes a hallow sound when thumped on the bottom.


Remove from pans immediately and cool on a rack for at least 1 hour before slicing or serving.


Lemon Tassies


Welcome back Spice! I knew she was still alive, but I'm sure some of you have been worried. I'll try to keep her posting as long as I can!

Onward:

My favorite pie is lemon. No meringue. Just lemon. My Dad makes it the best. Going home for Christmas this year, I got to taste my first Dad-made lemon pie in several long, lemon-missing years. It was bliss. Unfortunately, I only got a few slices in my pie hole before I headed back to the big apple.

These little dudes were supposed to help in my current lemon pie lacking situation (which is pretty awful). I was trying to not be a fat kid and make individual sized mini pies. Unfortunately, these were more like lemon cheesecake filling in a crust. Not bad! But not what I was looking for. I think I'm going to have to break down and make some lemon pie soon.

Lemon Tassies
Martha's Cookie Book

For the Crusts:

2 cups all-purpose flour

10 tablespoons cold unsalted butter, cut into chunks

1/4 cup plus 2 tablespoons sugar

2 large egg yolks

1 teaspoon pure vanilla extract

2 teaspoons finely grated lemon zest

1/4 teaspoon coarse salt

For the filling:

8 ounces cream cheese, room temperature

1/3 cup sugar

1 large egg

3 tablespoons finely grated lemon zest

1 tablespoon fresh lemon juice

1/2 teaspoon pure vanilla extract


Preheat oven to 350 degrees F. Coat two 24-cup mini-muffin tins with cooking spray.


Make crusts: Process flour and butter in a food processor until mixture is the consistency of fine crumbs. Add sugar, egg yolks, vanilla, lemon zest and salt. Process just until combined and sandy in texture; do not over-process.


Divide dough into quarters. Divide each quarter into 12 equal pieces, and shape into balls. Place each ball in a muffin cup; press into cup, stretching dough up the sides. Set each muffin tin on a baking sheet.


Bake crusts, rotating halfway through, until lightly browned all over and slightly darker at the edges, 18-20 minutes. Tap down any puffed centers of the shells with the end of a wooden spoon or your finger. Transfer sheets with muffin tins to wire racks to cool.


Make filling: With an electric mixer, beat cream cheese, sugar, egg, lemon zest and juice and vanilla on medium speed until smooth. Using a 1-inch ice cream scoop, fill the cooled crusts with filling.


Bake cookies, rotating sheets halfway through, until filling is set and just beginning to color at the edges, 10-12 minutes. Transfer to wire racks to cool completely.